This is just me running through the various menus of the Arduino Yún’s Web Control Panel. It is pretty impressive..
Tag Archives: Arduino
Arduino Yún, Part 2
OK, I have had my Yún for 3 days now, so let’s get started.
First of all, pictures:
The heart of the Arduino core: the Atmel MEGA32U4 microcontroller. 32KB of Flash memory, 2,5KB of SRAM and 1KB of EEPROM, the usual I/O, essentially a Leonardo. Pretty classic stuff.

What is not visible in the pictures, is this:
 This is the Atheros AR9331 processor. It runs at 400MHz, has 16MB of Flash, 64MB of RAM and runs Linino, a Linux distribution based on OpenWRT.
Now, with 3 different reset switches! From left to right, for the Yun (Linux), the WiFi and the 32U4 (Arduino).

I was wandering how fast “upload a sketch over WiFi” was, so I made a little video comparing it to the classic “upload over USB”:
Arduino Yún
Now, this is interesting. An Arduino that has an on-board processor that runs Linux and supports Ethernet and WiFi.
It is essentially a Leonardo with an Atheros AR9331 running Linino, an OpenWRT distribution.
They talk to each other through what is called a Bridge library. There is also an official Guide that looks very comprehensive.
A lovely feature is Arduino programming over WiFi! 🙂
Naturally, I ordered one as soon as it became available (that is, today!) and should have it in a few days.
Stay tuned..
Buffalo Shield v.1.1 for TFT HiFiDuino
Following my previous post on TFT HiFiDuino v.1.00, this is what you need to know in order to build my Buffalo Shield.
First of all, here are the DipTrace files (schematic & PCB): Buffalo Shield v.1.1 for TFT HiFiDuino (schematic & PCB) (13625 downloads )
And here is the relevant build & wire guide: Buffalo Shield v.1.1g for TFT HiFiDuino (documentation) (9421 downloads )
This is what DipTrace thinks the board ought to look like:

And this is what it actually looks like:

Close enough..
This shield features:
– Galvanic isolation for the I2C signals as well as 2 digital outputs (Arduino -> Buffalo) and 1 digital input (Buffalo -> Arduino).
– EEPROM chip (24LC256) either in SMT or DIP footprint.
– Backlight control for the TFT through a PWM-controlled transistor.
– Headers for two rotary encoders.
– Output for power relay (for remote on/off).
– Header for IR receiver.
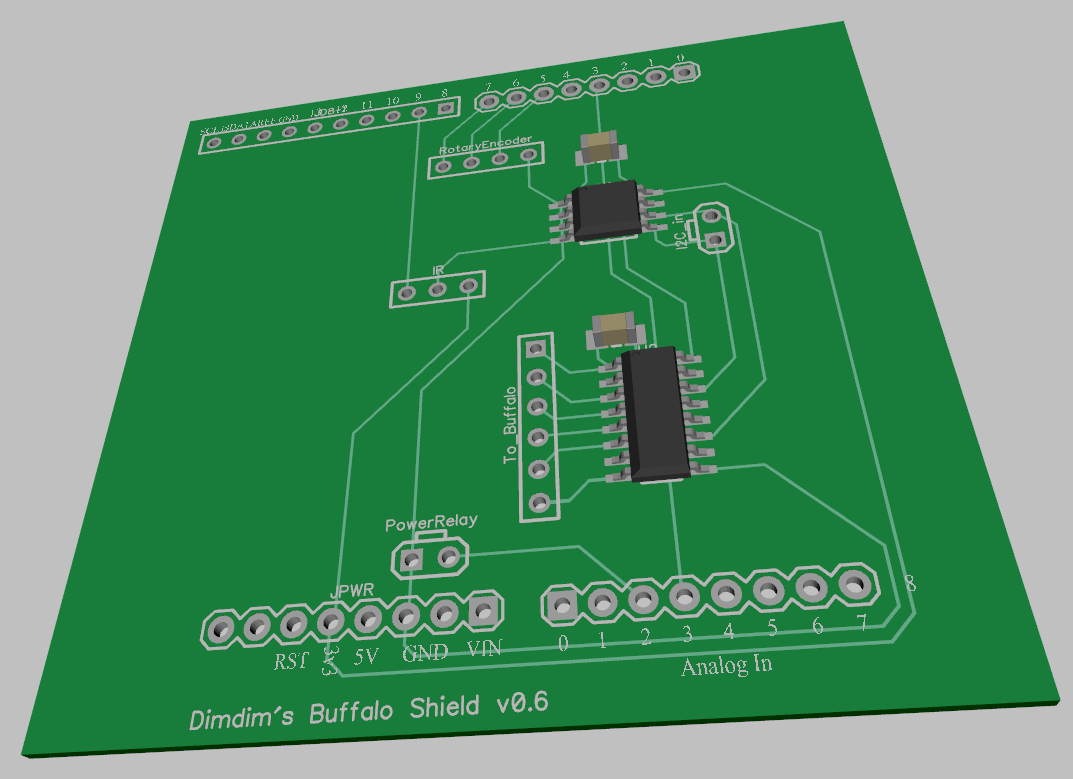
This is the schematic for the shield:

And this is the resulting PCB:

This is a description of the various headers:
IR: Use a standard 38KHz IR Receiver Module, like the TSOP4838.
1: Signal (Pin 9)
2: GND
3: 3.3V
RotaryEncoder1: Use any simple rotary encoder.
1: Left pin (Pin 7)
2: Right pin (Pin 6)
3: Selector pin 1 (Pin 5)
4: Middle Pin & Selector pin 2 (GND)
RotaryEncoder2: Use any simple rotary encoder.
1: Left pin (Pin A3)
2: Right pin (Pin A4)
3: Selector pin 1 (Pin A3)
4: Middle Pin & Selector pin 2 (GND)
I2C_In:
1: SDA
2: SCL
(note: this is the I2C connection to the Arduino. SDA should be connected to pin 20 and SCL to pin 21)
I2C_Bypass:
1: GND
2: SDA
3: SCL
(use this if / when an isolator IC (U2) is not used to send the I2C signal to the Buffalo)
Isolated_Outs:
1: Out 1 (Pin A2)
2: Out 2 (Pin A7)
TFT_power:
1: TFT Backlight LED (dimmed by Pin 8)
2, 3: 3.3V (for TFT power & pin RD)
4: GND
PowerInput:
1: GND
2: Vin (8V-12V)
(connect here the power supply to the Arduino)
PowerRelay:
1: GND
2: 3.3V out (Pin A0) in case of Due, 5V in case of MEGA
(connect here the power relay that powers on the DAC)
To_Buffalo:
1: Buffalo Vcc (3.3V)
2: SDA
3: Sidecar Control (Pin 3)
4: Lock LED input (Pin A1)
5: SCL
6: Buffalo GND
TFT HiFiDuino: Phase 1 complete!
It took quite a bit longer than I had expected but I am happy to report that Phase 1 of the TFT HiFiDuino project is complete.
The objectives of Phase 1 were the following:
– Have full control over the parameters of the ES9018 chip. Essentially be able to write to all of the useful registers.
– Be able to have full IR remote control functionality.
– Be compatible with both the MEGA as well as the Due Arduino boards.
– Be able to switch between all 8 of the supported s/pdif inputs, as well as between I2S sources (USB in my case).
– Develop an Arduino shield that would simplify the wiring of the thing as much as possible as well as provide galvanic isolation between the Arduino and the DAC board.
All of these objectives have been accomplished, so here is v.1.00 of the code: TFT HiFiDuino v.1.00 (10418 downloads ) (Update: there is a new version available! Click here for the latest version.)
If you happen to come across a bug, please let me know by posting a comment below.
Feel free to use it whichever way you see fit, modify it, redistribute it, whatever, as long as you do not profit from it.
Requirements:
– UTFT Library
– Fonts (included in the ZIP)
I will also make available the schematics & PCB for the shield, although it is not really necessary for operation of the controller.
Here is a preview:

Arduino Due Shield for TFT Hifiduino: Almost complete..
TFT Hifiduino Code v0.95
Update: TFT Hifiduino Code v0.95 available!
Download from here: B3_arduino_code_v0_95 (Note: As always, the code on this page may not be the current one, i.e. there may be a newer version available. The latest version is always up at the project’s official page.)
Here is a partial changelog:
– Changed rotary encoder code. Should work for MEGA as well as Due (no longer using interrupts).
– Added remote control codes for virtually all of the functionality that is offered by the encoder so now all of the parameters can be set via remote.
Bugs:
– Selection bar is still buggy. Haven’t gotten around to sorting it out.
Missing functionality:
– Disply backlight handling. It is next in line to be sorted.
– Sleep mode. Much research is needed, so won’t be implemented soon.
Also, I’m working on a simple MEGA / Due shield that should simplify things a lot. It is a work in progress, so I’m not ready to publish schematics or anything, but you can have a look at the current version’s 3D model:
3.2″ TFT pinout & connection to Arduino MEGA (or Due)
UPDATE (30/11/2013): Here is an easier way: https://www.dimdim.gr/2013/11/3-2%E2%80%B3-tft-connection-to-arduino-due-update/
Still, keep in mind that the info posted below still applies and is probably useful..
I’ve been asked what is the correct way to wire a 3.2″ TFT to an Arduino MEGA (or Due) in order to make it work with the UTFT library.
The answer of course depends on the exact model of the TFT that we have on hand. The below instructions apply to a generic 3.2″ TFT with wide aspect ratio and resolution of 240 x 400 that I got off of Ebay.
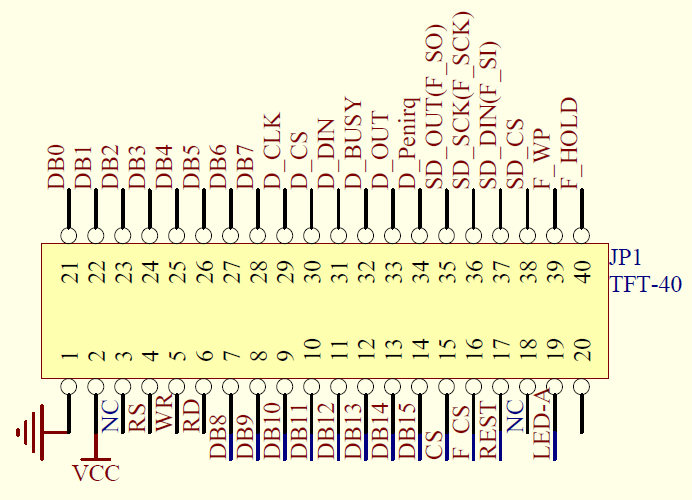
This is its pinout according to the manufacturer:
This is nice, but I want to use a standard 40-pin ribbon cable which I have left over from an old computer, and its conductor numbering is a little different. At first I thought I’d try to make sense of it as I went but it didn’t take long for me to realize that it would actually save me time if I made a “conversion table”. So I came up with what you see here:
 What we have here is the actual conductor number in the grey background (counting the conductors in the ribbon cable from left to right) and then above and below them the corresponding signal lines according to the above pinout. Above and below the signal lines I have noted the actual Arduino pins that correspond to the signals.
For example, pin 2 (the second pin on the flex cable looking at it from the left) corresponds to the DB0 signal which should be connected to the D37 pin on the Arduino MEGA (or Due). Note that the connections are made according to UTFT’s documentation and are applicable specifically to UTFT.
So we have to connect signals D0 through to D15 to the necessary digital pins. Then we also have to connect pins RS, WR, CS and REST to whichever pins we like (we must declare these pins in our sketch, see UTFT documentation). Pin 11 is RD and it must be pulled high, which means connecting it to +3.3V. Pin 37 is the backlight illumination which means it must also be connected to +3.3V. This leaves pin 1 which must be connected to ground and pin 3 which must be connected to Vcc which in our case is 5V.
Note that I have not really gotten around to using the touchscreen capabilities or the SD reader, so I have not connected them to my Arduinos. It shouldn’t be difficult though.
Now, there is one more thing that I should point out and it is very important. The Arduino MEGA is using 5V logic while the TFT is expecting 3.3V logic. This means that if you connect the D0-D15 and RS, WR, CS, REST lines directly to the MEGA you will most likely damage the TFT. You need to connect a 10K resistor in series with each and every one of the lines. That will bring the voltage down to acceptable levels. Do not forget to do this!
In case of the Due the resistors are not necessary since it uses 3.3V logic so it is directly compatible.
Here is a little video I made of the 3.2″ TFT running a UTFT demo sketch:
Good luck!


![arduino-yun-designboom01[1]](https://www.dimdim.gr/wp-content/uploads/2013/09/arduino-yun-designboom011.jpg)
![YunParts[1]](https://www.dimdim.gr/wp-content/uploads/2013/09/YunParts1.png)


